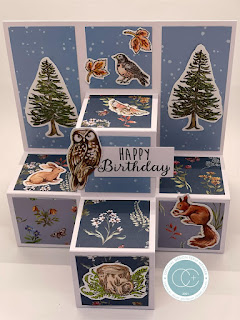
- Main base -turn sheet A4 portrait and cut one strip 12.5 cm wide. Shorten to 27cm long, score at 12.5
- turn strip so short side across top, score 1cm from each side down to 12.5 crease. then cut down the remainder of the way 1cm from each side. mitre cut across tab away from the cut lines.
- fold and burnish crease
- Pull out flap- cut another strip card 8.5cm and shorten to 26cm, score at 12 cm. the waste of this strip becomes the mechanism. fold and burnish
- Mechanism - trim to 7.5cm and score at 1cm then every 0.5cm leaving final 1cm at end. Fold and burnish well so it rolls backwards and forwards.
- Place mechanism so short edge level with fold of Pull out flap and in centre. Adhere 1cm tab with wet glue so it curls upwards. burnish fold along glue line.
- Open main base with narrow part to the right. Place pull out tab inside the main base so the 2 edges are level flap and in middle. Paperclip in place.
- completely flatten the mechanism onto pull out flap and add more wet glue to 1cm tab on right. Fold the base on top of flap and hold while mechanism sticks. remove paperclip. Open and burnish 1cm line and check it all looks ok - no excess glue.
- check it works before final gluing by holding the folded base and pulling the flap on the right. it should pull out and reveal inside of the card flap.
- open card with tabs on the left and gently push all the flap out of the way to the left.
- Fold tabs inside, apply wet glue or red liner glue to the tabs and close card.
- when testing for first few times, ensure that the flap is not catching on the tabs. burnish and adjust if necessary.
Designer/Instructor of Papercrafts, Memory albums/Scrapbooks, cards, social stationery, home decor items
About Me
- elegant edges
- I'm Lesley and I've been a crafter all my life. I discovered paper crafting about 30 years ago and this is now my great passion.
Sunday, 10 April 2022
Interactive Flapcard
Saturday, 27 November 2021
Pyramid Building blocks card
It showcases many of the beautiful papers and cute animals. I've also lined the blocks too as the insides are on view from the side and I couldnt resist adding different papers. This would be a great card for using up small scraps.
I love how it folds to post too.
CC products are available on their website. Here are the products I used:
In the Forest 6 x 6 paper pad SKU: CCPPAD031B
In the Forest bear stamp SKU: CCSTMP072
In the Forest Friendship stamp SKU: CCSTMP074
In the Forest - In the Forest stamp set SKU: CCSTMP073
Or if you can - get the whole collection!!!! SKU: INTHEFOREST
Have fun and see you soon
Lesley xx
tutorial link: https://www.youtube.com/watch?v=K1pZBuj8HAw&t=84s
Thursday, 25 November 2021
Shutter card
The opening
camera lens shutter reminded me of the hollows and cavities where many owls
nest, so it had to be the bark-effect paper for the trunk of the tree and
shutter mechanism.
There are
many video tutorials if you search YT so I didn’t see the need to reinvent the
wheel here.
If you love
this collection or I have inspired you to try to make this card style, please
leave me a kind comment below.
Au revoir! Auf Wiedersehen! Tot ziens!
See you
again soon,
Lesley
Wednesday, 24 November 2021
Floating pop-up box - any size
Good morning,
Today I have a pop-up box thats a little different. I spotted this shape on Pinterest but those boxes all seemed to have been made with specialist dies and I wanted to make one NOW! I'm sure you know this feeling! After I had started making this, I did spot a tutorial using a similar method to mine by #IcedImages so I have linked that tutorial below. My way makes it possible to achieve any desired card size.
This is a hexagon-shaped pop-up box that folds flat to post and the design travels down the card and floats on acetate. It took 2 sheets of A4 card and a scrap of acetate.
I was going to use hexagon nesting dies but mine are stitched and I wanted plain! Grrh! so I had to draw out my own shapes - not that difficult if you have a school-type compass as a hexagon is basically 6 equilateral triangles put together.
I roughly cut an oval shape by eye from acetate scrap and adhered all the decorations, lifting some on foam pads in front, some were placed on the back panel and some with foam on back to give layers of dimension. finally, added a last decorative element to the from of the box to create my little woodland idyll in a box.
All my decorations are stamped images from the beautiful atamp sets - there are three different ones and I really do need all three. The animals are so very cute and not difficult to colour or fussy cut.
I bet you guessed, I am totally smitten with it!
If you like this card, please leave me a few kind words below and pop across to my other social media pages for more makes with this collection.
https://www.instagram.com/elegant_edges_crafts/?hl=en
https://www.facebook.com/kilby.Lesley
See you soon
Lesley x
Tutorial: https://www.youtube.com/watch?v=IsDf9opHXZA&t=14s
New Collection - In the Forest by Craft Consortium
Hi everyone.
I am really excited to share the beautiful new Collection by Craft Consortium – In the Forest – designed by Claire Therese. This is being launched today and I cant wait for you to see it!
It comes in
12 x 12 and 6x6 acid free paper pads. They contain a mixture of 200gsm uncoated
papers and 150gsm pearlescent papers, a generous 40 double-sided sheets in each
pad, and are just wonderful to work with. Even the inside covers are covered
with topper elements from the pads that can be cut out and used like extra
chipboard items. There are also 3 different stamp sets, washi tapes, metal
charms, enamel dots and chipboard elements. Everything is the high quality that
we have come to love and expect from Craft Consortium.
I was truly
blown away when I opened my DT package and my creative juices started to work.
I am quite a reluctant stamper but the first thing I did upon opening my
package, was to stamp and colour all the images, cut them out and just play!
Some of my fellow Design Team members have produced short YT videos showing the collection in all its glory and I’ve listed the links to their SM below. Do hop over to their channels and to my Instagram - elegrant_edges_crafts, where I'll be sharing a new make each day. Please leave each of us some love as it makes our posts more visible.
Thanks for visiting
Lesley x
https://www.instagram.com/elegant_edges_crafts/
https://www.instagram.com/themisshaven
https://youtube.com/channel/UCqZLivtQUb1cG2ahYnhHlLQ
Friday, 1 October 2021
Northern Star Box
I do love a fancy fold! I think I acquired my love of this beautiful fold when I lived in Germany and Scandinavia. Uncomplicated, yet elegant!
Thursday, 30 September 2021
Cigar box
These Patina papers from Craft Consortium are so beautiful; gorgeous colours that flow into the next without patterns or florals. They are reminiscent of cosmic activity and are just made for backgrounds and male cards. The most difficult problem I had was choosing which of the papers to use for this box project. The only dies I used were for the hinges and the magnetic closure. If you want to see all the papers go to www.craftconsortium.com.
.....and two hinges on the back.
I could have added more patina papers inside but felt the matt black contrasted better with the stunning papers this way. I used 200gsm card for the construction, doubling where needed for extra strength.
I can see myself making lots of projects with these Patina papers. I hope you love them as much as I do.
Lesley
xx
Super Easy Faux Pleat cad
Good Morning, It's been some time since I posted on my blog, but I hope you have all been following me on Instagram and Facebook, as tha...
-
Good evening, I couldn't resist making another Zigzag card and had to try out a beautiful collection by The Paper Boutique called Floral...
-
Today is a much requested version of a three panel fancy fold card I posted on Instagram and sent out to some of my friends for Christmas. I...
-
Today I have a sweet front-step fold card to share with you that I made as Design Team Member for Crafter’s Companion for the launch of th...