About Me

My photo
I'm Lesley and I've been a crafter all my life. I discovered paper crafting about 30 years ago and this is now my great passion.

Saturday 27 November 2021

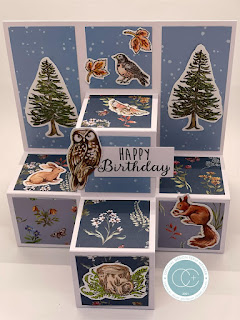
Pyramid Building blocks card

Here is another of my design team makes with the new In the Forest collection. It is on a 5 3/4 inch square base and would work both as a  tent fold or book opening style. 


It showcases many of the beautiful papers and cute animals. I've also lined the blocks too as the insides are on view from the side and I couldnt resist adding different papers. This would be a great card for using up small scraps.


I love how it folds to post too.

CC products are available on their website.  Here are the products I used:

In the Forest 6 x 6 paper pad  SKU: CCPPAD031B

In the Forest bear stamp SKU: CCSTMP072

In the Forest Friendship stamp SKU: CCSTMP074

In the Forest - In the Forest stamp set  SKU: CCSTMP073

Or if you can - get the whole collection!!!!  SKU: INTHEFOREST


Have fun and see you soon

Lesley xx


tutorial link: https://www.youtube.com/watch?v=K1pZBuj8HAw&t=84s


Thursday 25 November 2021

Shutter card

I really wanted to make this style of card when I saw all the adorable Forest animals and gorgeous papers. The pine paper on the front of the gatefold has a design depth of approximately 2”, so a 6 x 6” card was the obvious choice.

The honey-coloured pine on the front inspired my choice of foundation card and, inside, I added matts of rich dark green to bring out the traditional pine colour.


The opening camera lens shutter reminded me of the hollows and cavities where many owls nest, so it had to be the bark-effect paper for the trunk of the tree and shutter mechanism.


The belly band is decorated with the wider washi-tape in the collection that echoes the main design paper.  I die-cut the base layer of one of the decoupage images to form the topper, backed with a scalloped honey-coloured die cut layer.


As there is nowhere to add an insert, I matted plain white card on the back of the card and decorated this with two strips of the narrower washi-tape. Such a quick-fix to add a trim! I might have rediscovered my new favourite effect!

There are many video tutorials if you search YT so I didn’t see the need to reinvent the wheel here.

If you love this collection or I have inspired you to try to make this card style, please leave me a kind comment below.


Au revoir!   Auf Wiedersehen!   Tot ziens!

See you again soon,


Lesley


Wednesday 24 November 2021

Floating pop-up box - any size

 Good morning,

Today I have a pop-up box thats a little different. I spotted this shape on Pinterest but those boxes all seemed to have been made with specialist dies and I wanted to make one NOW! I'm sure you know this feeling! After I had started making this, I did spot a tutorial using a similar method to mine by #IcedImages so I have linked that tutorial below. My way makes it possible to achieve any desired card size.


This is a hexagon-shaped pop-up box that folds flat to post and the design travels down the card and floats on acetate. It took 2 sheets of A4 card and a scrap of acetate.

I was going to use hexagon nesting dies but mine are stitched and I wanted plain! Grrh! so I had to draw out my own shapes - not that difficult if you have a school-type compass as a hexagon is basically 6 equilateral triangles put together. 


Start by drawing a line. I wanted a side length of 2 1/4" so set compass to that length and marked line, put point at each corner to draw traingel. From top point I could draw a crcle and continue with triangles until I had a hexagon shape by joining all base point - simples! I then extended one side to make a square of 2 1/4 " and cut it out of card to use as a template. I drew around this and added a square on each side of the square (now 3) and a 1/2" tab to one of those squares. (see shape on left).


I repeated this shape and added a second hex to the drawing for the other part on the right. one hex from each drawing was scored across the centre. The square were score downwards but not across the untousnscored hex as this is the stand-up section at the back. I joind the tabs on the squareto form a ring and eassed into desirted shape. the 2 scored hexagons were glued across half the shape to form a stand-up wall across the centre to hold the acetate. I chose that size so it was easy to add 2" matts to the sides! 


I roughly cut an oval shape by eye from acetate scrap and adhered all the decorations, lifting some on foam pads in front, some were placed on the back panel and some with foam on back to give layers of dimension. finally, added a last decorative element to the from of the box to create my little woodland idyll in a box.

All my decorations are stamped images from the beautiful atamp sets - there are three different ones and I really do need all three. The animals are so very cute and not difficult to colour or fussy cut. 

I bet you guessed, I am totally smitten with it! 

If you like this card, please leave me a few kind words below  and pop across to my other social media pages for more makes with this collection. 

https://www.instagram.com/elegant_edges_crafts/?hl=en

https://www.facebook.com/kilby.Lesley


See you soon

Lesley x


Tutorial: https://www.youtube.com/watch?v=IsDf9opHXZA&t=14s


New Collection - In the Forest by Craft Consortium


Hi everyone.

I am really excited to share the beautiful new Collection by Craft Consortium – In the Forest – designed by Claire Therese. This is being launched today and I cant wait for you to see it!

It comes in 12 x 12 and 6x6 acid free paper pads. They contain a mixture of 200gsm uncoated papers and 150gsm pearlescent papers, a generous 40 double-sided sheets in each pad, and are just wonderful to work with. Even the inside covers are covered with topper elements from the pads that can be cut out and used like extra chipboard items. There are also 3 different stamp sets, washi tapes, metal charms, enamel dots and chipboard elements. Everything is the high quality that we have come to love and expect from Craft Consortium.

I was truly blown away when I opened my DT package and my creative juices started to work. I am quite a reluctant stamper but the first thing I did upon opening my package, was to stamp and colour all the images, cut them out and just play!


Some of my fellow Design Team members have produced short YT videos showing the collection in all its glory and I’ve listed the links to their SM below. Do hop over to their channels and to my Instagram - elegrant_edges_crafts,  where  I'll be sharing a new make each day. Please leave each of us some love as it makes our posts more visible.

Thanks for visiting

Lesley x

https://www.instagram.com/elegant_edges_crafts/

 https://www.youtube.com/c/ElisabethHogarthDesigns

 https://wordpress.com/view/elisabethhogarth.wordpress.com

 https://youtube.com/c/TheMissHaven

 https://www.instagram.com/themisshaven

https://youtube.com/channel/UCqZLivtQUb1cG2ahYnhHlLQ

 https://www.instagram.com/cardsbykatefletcher

 https://www.facebook.com/Cards-by-Kate-111227389688501/

Friday 1 October 2021

Northern Star Box

 I do love a fancy fold! I think I acquired my love of this beautiful fold when I lived in Germany and Scandinavia. Uncomplicated, yet elegant!


Here, I've chosen to showcase the fabulous Midnight Flight papers and picked out the green of the butterfly with the contrasting leafy papers from the same collection. The finished size is approx 6" (15cm) high and 3" (7.5) across the hexagonal                                                               base. 


Sometimes I switch between imperial and metric measurements to get the best out of a sheet of card. I used 200 gsm card as it is just right to hold its form yet is not too thick to take a sharp crease for the star shape. This takes one  A4 sheet - trim length to 25 cm


1. score along long side, every 4 cm
2. turn and score at 4 and 17.5
3. score diagonally across 4 x 4 squares at top
4. score from top of card down to centre of cross "2cm)
5. trim excess off tab
6. cut up scorelines from bottom to horizontal score (3.5 cm long)
7. crease gently with fingers to achieve shape - care with star at top - see templates colours        for valley and mountain folds
8. punch small holes in top to thread ribbon
9. decorate side panels before making up 3.5 x 13
10. glue side tab to form box
glue bottom tabs in opposite pairs - iff difficult cit 2 circles 6.5 cm diameter to hold in place outside and inside to reinforce
11. Thread narrow ribbon or twine through holes and pull uip gently to close box


Once you have made one, they are easy and straightforward. You can easily vary the height of the box to fit different gifts, if you widen each panel remember to make the top section deeper by the same amount as it must still be square. 

Hope you try these - remember to let me know and share your makes  - you can tag me on IG
@elegant_edges_crafts.

Have fun
Lesley
xx


Thursday 30 September 2021

Cigar box


 These Patina papers from Craft Consortium are so beautiful; gorgeous colours that flow into the next without patterns or florals. They are reminiscent of cosmic activity and are just made for backgrounds and male cards. The most difficult problem I had was choosing which of the papers to use for this box project. The only dies I used were for the hinges and the magnetic closure. If you want to see all the papers go to www.craftconsortium.com.


I took great trouble to match the paper over the top and chamfered edge so that the paper design flowed seamlesly across the box. It has a magnet closure on the front...

.....and two hinges on the back.


I could have added more patina papers inside but felt the matt black contrasted better with the stunning papers this way. I used 200gsm card for the construction, doubling where needed for extra strength.

I can see myself making lots of projects with these Patina papers. I hope you love them as much as I do.

Happy crafting
Lesley
xx

Craft consortium products used: Patina papers

Credit: Angelina of Intatwyne designs

Double slider gift card holders


With Christmas and lots of family birthday approaching, I have been thinking about cute gift card holders. I wanted to use the made by Elves collection by Craft Consortium.   


I made a double slider gift card holder following a tutorial I found (credit below) and it was really cute. I am always fascinated by the slider mechanism and how magical it looks when you pull open a tag. I thought this would intrigue the older grandchildren and, to be honest, the men in the family! (Don't tell them I put them in the same category as the grandchildren though!)


Prompted by fellow DT member Kate, I decided 
to add not only a sker element but to make it an  
edgeless one. 

I used  6 x6 papers from the fabulous new Midnight Flight 
Collection to show off  the smaller design and include the really pretty sequins from the collection in the shaker.

This was soo easy - just some acetate cut about 1/2" or 1 cm larger than the design paper. I wrapped this loosely around the paper and adhered it with red liner tape, popping in the sequins before closing the last side. Then continued as the previous gift card holder.


Both really gorgeous, if I say so nyself. I hope you give these a go - see the link to the tutorial below and why not try adding an edgeless shaker too.

Remember, it's never too early to prepare for Christms or upcoming birthdays.

Have fun
Lesley
xx

Craft consortium products used:
Made by Elves 6 x 6 papers
Midnight Flight 6 x 6 papers and sequins

Credit: The Paper Pixie for initial tutorial 

Two tents are better than one

Here is a Double Tent card made with the adorable Sandy Paws Collection by Craft Consortium. I fell in love with this collection before I even joined the DT. Who could fail to love these cute animals in a seaside setting? Living so close to the sea myself, this really appealed to me. 


I love easy designs that still have impact and I turn to this style time and time again. I like how it has plenty of room to write personal message inside.It is so quick and easy to make and is very economical on paper when matted and layered in my own favourite patchwork style.

You will need: 
       ·         card blank 5 ¾ x 5 ¾ (14.5cm) or cut one from A4 card (bought as 6” card blank!)
 ·         card blank 4 x 4 or cut one to 4 ¼ x 4 ¼ from card (see notes below)(10cm or 10.5cm)
      ·         topper at least 4” square or diameter (10cm)
·         scraps of design paper and contrasting paper to mat 

This design works well for circular or square toppers but today I have a square topper cut from 12 x 12 sheet of Sandy paws papers. This will fit exactly onto a premade 4” card blank or I could trim it and mat with the same contrasting paper onto a 4 ¼ “, which I decided to do.


To cut aperture:

If you have a square die 3 3/8 or 8.5cm cut this centrally into the card front, or use a scalpel or trimmer leaving a 1 1/8 or 3cm frame outside. Tip- this is exactly the width of my metal ruler. 


Cut strips of contrasting paper for mat layer 1” wide or 2.5 cm. I like a pinwheel effect like patchwork and cut them 4 1/2“ long (approx. 11.2 cm)

Check each side to ensure they fit and trim if necessary, before adhering, especially if you have die-cut the aperture.


Mat (and layer) the topper onto smaller card base ensuring it is tent fold. Place this centrally inside main card, lifting and checking all correct before adding glue. I use Collall wet glue here and don’t press down, lifting outer card to check it is straight from inside too. If desired, can add stamps to inside of card too.

Voilà!


Happy Crafting

Lesley xx

Craft Consortium Products used:
Sandy Paws Collection: topper from cut apart sheet 12 x 12 paper pad
backing papers from 6x6 paper pad

Credit: Iced images for original idea

Exploding house memory box

Having received the stunning Made by Elves Collection in my DT package, I immediately thought of a gingerbread house. As I love prserving memories with memory albums, this was my first make with the collection; how fabulous would this be for keeping Chrsitmas memories of children or grandchildren! I added my own special surprise gift in the centre too.


Here is a walk-through of the project. Watch it all theough for the surprise gift and there is a full tutorial below of how to make the surprise.


For instructions on how to make the Jacob's Ladder element in the centre of the house, here is a link to my own tutorial. 


Craft Consortium products used in this projects: 
Made by Elves Collection
12 x 12 papers

Credit: Exploding box tutorial by Love for Crafts

Expanding Accordian Card


I’ve been meaning to try this popular style of card and couldn’t think of a better collection to use than the Happy Haunting!

I chose the 4x4 cut apart for the front with the name of the collection and two others for the inside panels. I reversed the matting colours: green for the front to contrast with the pumpkins and orange inside against the green spooky house paper.

I used 1" alphabet dies for the words and centred them across the card. I had to use an exclamation mark as my OCD kicked in because hunting had an even number of letters. for the top row I stamped the ghost, tombstone, zombie owl, spider, pumpkin and todstool. These are so easy to fussy cut and I kept to the original colours of the paperkit.

For the back, I returned to the green matting to match the fron of the card with the striking wordy page. 

One of my pet hates with clever folded cards is that there is sometimes insufficient room to write a personal message. I added a plain white 4" square tile to match the other designs and just scribbled little  webs and hanging spider in the corners to take off the plainness and match the collection. 


The finishing touches were 4 enamel dots in the corners on the front and black organza ribbon under the mats to tie. This was the perfect place for one of the fabulous tombstone charms too. I love how everything you need is included in the collection. 


Happy Haunting everyone!
Lesley x


Craft Consortium Happy Haunting collection products used: 
12 x 12 papers
6x6 papers
Clear stamps
Tombstone charm
Enamel dots 

Credit: There are so many similar styles on social media that I am unable to credit the original designer


Wednesday 29 September 2021

Coffin self-closing treat bag


This really cute little self-closing treat bag is such a quick and easy make.  It was inspired by Keren Hughes and adapted for the Happy Haunting Collection. It has a wide base and flat top so the folds and clever shape  make the bag close.  


It is made with a 6 x 6 1/2" paper.                                               

  • along the long side score down at 3 and 6               
  • turn and score 1 and 5 on shorter side
  • on back with ruler and scoring tool, join as diagram   
  • cut away hatched sections
  • gently fold and press on score lines
  • glue to make box
  • decorate with stamped sentiment
  • add sweets

Craft consortium products used:
Happy Haunting 12 x 12 200 gsm papers
Happy Haunting clear stamps

Credit: Tuppence coloured

If the Shoe fits...

In my first bumper DT haul from Craft Consortium, I also received the Happy Haunting Collection. This is another collaboration between CC and Helz Cuppelditch. It actually came out last year but was relaunched in September. My package contained 6x6 and 12 x 12 papers, decoupage pack, puffy stickers (eek - I love these!) , 2 packs of clear stamps, enamel dots to match the paper pads and 2 packs of charms - witch hats and tombstones. 

The characters are again whimsical and I would describe them as spooky rather than scary so little ones should not be upset by them and, having grandchildren myself, I know that is important. Some of the pages have highlighted images in a shiny-coated finish to add a further touch of luxury.


I have to admit that I have never gone in for Hallowe'en in a big way before but these papers and characters are just so cute that my mind was in a mixture of panic and overdrive thinking of how to use them. My first project was inspired by a picture I saw on Pinterest  by binkyblossoms.blogspot.com but it didnt lead anywhere. 


This is how I made mine.First of all, I made a rough drawing of a shoe/boot on copy paper and added the tongue and heel detail. I am used to creating shaped cards from outline dies and went about it the same way only cutting by hand. Once I was happy I traced this twice more and cut parts away to get layers like decoupage for different papers. I cut the scallop edge with kiddy scissors. 

This is where I wished I could still remember how to use my scan n cut machine as this would have made it all so much easier! Note to self - get out machine again and start to use it! 


Having selected the papers from the 12 x 12 pack I cut out the tent fold base card from 300 gsm black card and and prepared the layers. Luckily I had some ghastly green lace that came in a bundle - I never thought I would use it but it was just right here! I ruched some up between the layers for the heel and along the top with red liner tape and finally threaded it  it up the front, adding a bow and some fussy cut tags with a hot-glue gun. 

I was so happy the way this turned out but will definitely be teaching myself how to use my cutting machine again. 

Craft Consortium products used:

Happy Haunting 12 x 12   200gsm papers

Box of Shaker Tags

I can't tell you how excited I was to receive my first DT haul from Craft Consortium. Since then I have just been crafting my litle fingers off as everything was really lovely and it was hard to know where to begin. Very remiss of me not to post anything on here before now as I have now been a DT member for the whole of September and I have lots of catching up to do. 

First of all I fell in love with the Made by Elves Collection; a quality collection using artwork produced under license from Helz Cuppelditch.  It  consists of paper pads (well 200gsm is card really) of 40  6x6 and 12x12 double sided sheets, 3D decoupage pack,washi tape, 4 packs of super quality clear stamps, washi tape in 2 widths, a pack of little elfie spanner charms and also matching enamel dots. 


One of the first projects I made was a little double-sided box holding a collection of shaker tags. The box opens to reveal two pockets, one on each side.  I left lots of room for the tags as they were quite chunky having a shaker element on top.  It is kept closed with a simple lid that I finished with a paper bow. There are lots of tutorials on YouTube for these if you need one.                                                                                                                  I began by hunting through my stash to find small nesting dies for the shaker windows that allowed the images from the 6"  papers to shine. There are pages with 4 cut-aparts of these cute, whimsical characters that are just the right size! They determined the size of the tags and ultimately that of the outer box.  A red ribbon was added to a hole punched in each tag and finished with a loopy bow of red/white bakers twine and a vintage button from my Mum's old button box. She always told me they would be                                                                                     useful!  

I added fine white frames to the tags to edge the windows, then some faux snow along the top of the frames and dotted around the Kraft card to create a snowy background. I fussy cut some tiny sentiments from the wordy pages. These are really useful little additions for projects or just to be used as page in their own right.                                                                                                                                                The box is decorated with papers from the 12 x 12 pad. I love how there are similar designs with a light and dark background to give contrast to a project. All the shapes are easy to fussy-cut too. 


Craft Consortium products used from the Made by Elves collection:
6 x 6     200 gsm paper pad
12 x 12   200 gsm paper pad 


Tuesday 24 August 2021

Exciting news

 I am thrilled to post that Craft Consortium have recently announced their new Design Team and guess what! I'm included. Here I am with my new Teamies. 


So look out for my new posts and catch me on Instagram and facebook too.

Here are my social links: 

https://www.facebook.com/kilby.Lesley

https://www.instagram.com/elegant_edges_crafts/?hl=en

https://www.facebook.com/groups/989114164562461

I have already been  contributing to the CC Network page too and you might see some of my makes on the new lauches on Create and Craft TV soon too. 

Hope to see you all very soon

Lx


Tuesday 11 May 2021

Dolphin Delight

 It's a beautiful sunny morning here in Hampshire, UK and I have another one of my Zigzag cards. I am getting quite addicted to these and also to the beautiful Floral waves papers. 


This one is made for the Facebook group Creative Minds Kind Hearts, so welcome if you have found me via this group. They have a weekly challenge starting Wednesdays and the challenge this week is one of the zigzag cards. I have updated the template with Mountain and Valley folds too. 


The mats were made in strips 1 1/4" wide 
2 of 1 1/4 x 6 3/4                
2 of  1 1/4 x 5 3/4
2 of 1 1/4 x 1 1/4
1 of 3 3/4 x 5 3/4

and the design Paper 1" wide as follows
2 of 1 x 6 1/2
2 of 1 x 5 1/2
2 of 1 x 1
1 x 3 1/2 x 5 1/2

If you are a metric maid I would make it 27 x 18cm with 3.5 cm indents for the edges. This leaves you with 3cm for mats and 2.5cm for design papers.

Have fun crafting and I hope to see makes on Creative minds kind hearts fb page.

Materials used

I sheet 300gsm card for base

Floral waves insert papers  and solid colour card by Paper Boutique


Thursday 6 May 2021

Bathtime bubbles Theatre - Tunnel card

Today I'm posting my fun theatre-tunnel card with the Enjoy the bubbles pop-out scene dies and stamps. I adapted a Theatre card tutorial by Sam Calcott using the front of the stage and pull out wings adding lace drapes for a more intimate boudoir atmosphere. I completely changed the back of the card adding a tunnel effect.

The back of the card actually has 3 layers - to give the idea of peeking through the curtains and into the room. I stamped and die cut this 3 times and snipped away to leave what I needed. Each layer was made 1/2" wider than the card. It was scored and folded at 1/4" on each side and the tab stuck to the sides with red-liner tape which made a 1/4" gap between the layers. As you stick the inside layers, gently make sure that the card will fold flat. 

(1) The outside layer has the bubbles only that are cut into the white card and layered with blue. The bubbles were then stamped, coloured with tri-blends, and die cut before layering with foam pads formore dimension.

(2) the middle layer has the bubbles and the bath with the lady snipped away. The bath has been die-cut from centura metallic card to give a coppery look and more bubbles and the duck added

(3) the last layer was everything including the lady 

(4)Finally,  the sentiment was edged with Parakeet ink and adhered to the inside back of the card.


Materials I used:

Gemini Enjoy the bubbles Pop-out scene stamp and die set 
Crafters Companion 300gsm stamping card
Crafters Companion Textured Cardstock blue
Crafters  Companion Everyday Celebrations papers
Centura pearl Metallic card
Tri-blend markers - ice blue blends
Finesse black ink
Collall all purpose glue
Red liner tape
Foam pads
Lace from stash

https://www.youtube.com/watch?v=peu95xJlDUw&t=1348s

Wednesday 5 May 2021

First birthday card

Good afternoon again,

Today I am posting a Design Team make for Crafter's Companion that showcases the Cut in Dies and Sentiments. I deliberately chose a number that wasn't a typical milestone and the final size was dictated by the embossing folder that sprang to mind; albeit a very old one by CC, but definitely one of my favourites.


The Happy Birthday embossing folder is 5" x 7". I decided that the top layer would look good 3 1/4 x 6 1/2" but cut card a little larger. I die cut the number one in the centre before embossing a piece of luxury blue cardstock and trimmed to desired size.  This gave me the dimensions for the card base. Using my diagram, score the card base in 3 and the outside sections in half again, then the outside panels diagonally. My base was 11 1/4" x 7" and each large section was 3 3/4" wide. The narrow sections were half of 3 3/4 = 1 7/8" wide.

To cut the mats, I decreased the overall size by 1/4" in each direction for each layer. 
I wrapped ribbon around the embossed card before adhering it to the card base, which accented the "waist" of the card and added extra interest. 

The centre back panel is the ideal place to add your own greeting and  sentiment.

Materials I used:

Gemini Cut in Numbers Dies
Crafters Companion 300gsm stamping card
Crafters Companion Luxury cardstock - blues
Crafters Companion Happy Birthday Embossing Folder (retired)
Collall all purpose glue

Ribbon from own stash


New SU Catalogue launching May 1st

             As a Stampin' Up! demonstrator, one of the best perks is being able to preorder a selection of new products in the brand-ne...