About Me

My photo
I'm Lesley and I've been a crafter all my life. I discovered paper crafting about 30 years ago and this is now my great passion.

Monday, 27 June 2022

Exciting crafting news from me

 Hi everyone,

Just a quick update with some exciting news in my crafty life. If you follow me on facebook or Instagram, you may have noticed me sharing some makes with Stampin Up! products. 


This does not mean that I have foresaken Craft Consortium as I really do love their products and will continue to design for them as every collection they bring out really thrills me. However, sometimes we see an offer that is just too good to pass by and I did just that with the May demo offer from Stampin Up!. I have often seen stamp and die sets that they sell and wondered..... so I have jumped in and am giving it a big try. I knew that if I didn't try I would always wonder. I love their tag line too - inspire, Create, Share - that is exactly what I aim to do, so it seems to fit very well into my way of thinking. 

Please continue to support me and take a look at all my makes for both companies and pop along to my Stampin Up! shop for a nosey - you might see something there that appeals or you might even want to join me at SU as part of my team - the more the merrier. If you see anything you would like to purchase, message me first for a special code - there will be a different one each month.

I'll be sharing links to the annual catalogue and the new winter catalogue very soon.


Meanwhile,

Keep crafting! x

Sunday, 29 May 2022

Charm treasure chest


Ocean Tales premium paper collection


I have had so much fun designing projects for Craft Consortium with this beautiful collection. Today, I was playing with my oval dies and the idea for this little box came to me. I hadn’t seen anything quite like this before but I doubt it is an exact original! If you use this idea, please credit me until we know better!


You’ll need:

·        Oval nesting dies - largest scalloped die for the base – 16.5 cm long (6 1/2”)

·        next size down plain or stitched oval die -15cm (6”)

 Ocean Tales 6x6 premium paper pad

 Ocean tales A4 co-ordinating paper pad

 Ocean Tales stamps, puffy stickers or chipboard embellishments

 Instructions:

·        die cut larger oval from black card

·        find centre of length of oval and make 2 scorelines ½” apart (1.4cm)

·        cut smaller plain oval die and lay centrally on larger die. Mark score lines to fit. Burnish   one and cut the other. 

·        cut a strip of card A4 x 1” and score along the length at ½”. Snip into the card up to the   score line every ¼”, then diagonally to make “teeth” shape along edge.

·        use bone folder along the card strip to ease into rounded shape and stick along the   outside edge of the plain oval to form a box.

·        use same plain die plus one even smaller to cut matts and layers for box.

·        adhere ribbon under the initial matt to form closure. Then decorate with stamps or other   OceanTales embellishments and they are all fab.


Have fun with this idea that you can change up for most die shapes and depths of box.

See you soon

Lesley

Sunday, 10 April 2022

Interactive Flapcard

Hello again. It's been a little while as I have been so busy creating projects that I totally forget to blog! After sharing details of this interactive card on social media, I have been asked for details of how its made. so here you are! For this Design Team project I've used the luxury Wildflower Special Edition collection from Craft Consortium.

The completed card fits a C6 envelope. 


The base only takes one sheet of A4
  • Main base -turn sheet A4 portrait and cut one strip 12.5 cm wide. Shorten to 27cm long, score at 12.5 
  • turn strip so short side across top, score 1cm from each side down to 12.5 crease. then cut down the remainder of the way 1cm from each side. mitre cut across tab away from the cut lines. 
  • fold and burnish crease
  • Pull out flap- cut another strip card 8.5cm and shorten to 26cm, score at 12 cm. the waste of this strip becomes the mechanism. fold and burnish
  • Mechanism - trim to 7.5cm and score at 1cm then every 0.5cm leaving final 1cm at end. Fold and burnish well so it rolls backwards and forwards.
  • Place mechanism so short edge level with fold of Pull out flap and in centre. Adhere 1cm tab with wet glue so it curls upwards. burnish fold along glue line.
  • Open main base with narrow part to the right. Place pull out tab inside the main base so the 2 edges are level flap and in middle. Paperclip in place.
  • completely flatten the mechanism onto pull out flap and add more wet glue to 1cm tab on right. Fold the base on top of flap and hold while mechanism sticks. remove paperclip. Open and burnish 1cm line and check it all looks ok - no excess glue.
  • check it works before final gluing by holding the folded base and pulling the flap on the right. it should pull out and reveal inside of the card flap.
  • open card with tabs on the left and gently push all the flap out of the way to the left. 
  • Fold tabs inside, apply wet glue or red liner glue to the tabs and close card.
  • when testing for first few times, ensure that the flap is not catching on the tabs. burnish and adjust if necessary. 
Decorate with the beautiful Wildflower special edition papers and stamps.

I created the sentiment strips on PC.


CC Products used.
Craft Consortium Wildflower Special Edition 12 x 12 papers, stamps. 
These are available from www.craftconsortium.com and many good retailers.

I have seen several variations of this card made but have been unable to find the original creator - I will gladly credit the original designer if she/he messages me. 

You may like to follow me on social media to see many more makes. Please leave me a nice comment if you have found this helpful.

Kind regards,

Lesley


Saturday, 27 November 2021

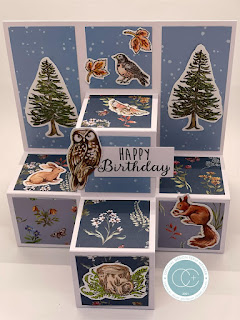
Pyramid Building blocks card

Here is another of my design team makes with the new In the Forest collection. It is on a 5 3/4 inch square base and would work both as a  tent fold or book opening style. 


It showcases many of the beautiful papers and cute animals. I've also lined the blocks too as the insides are on view from the side and I couldnt resist adding different papers. This would be a great card for using up small scraps.


I love how it folds to post too.

CC products are available on their website.  Here are the products I used:

In the Forest 6 x 6 paper pad  SKU: CCPPAD031B

In the Forest bear stamp SKU: CCSTMP072

In the Forest Friendship stamp SKU: CCSTMP074

In the Forest - In the Forest stamp set  SKU: CCSTMP073

Or if you can - get the whole collection!!!!  SKU: INTHEFOREST


Have fun and see you soon

Lesley xx


tutorial link: https://www.youtube.com/watch?v=K1pZBuj8HAw&t=84s


Thursday, 25 November 2021

Shutter card

I really wanted to make this style of card when I saw all the adorable Forest animals and gorgeous papers. The pine paper on the front of the gatefold has a design depth of approximately 2”, so a 6 x 6” card was the obvious choice.

The honey-coloured pine on the front inspired my choice of foundation card and, inside, I added matts of rich dark green to bring out the traditional pine colour.


The opening camera lens shutter reminded me of the hollows and cavities where many owls nest, so it had to be the bark-effect paper for the trunk of the tree and shutter mechanism.


The belly band is decorated with the wider washi-tape in the collection that echoes the main design paper.  I die-cut the base layer of one of the decoupage images to form the topper, backed with a scalloped honey-coloured die cut layer.


As there is nowhere to add an insert, I matted plain white card on the back of the card and decorated this with two strips of the narrower washi-tape. Such a quick-fix to add a trim! I might have rediscovered my new favourite effect!

There are many video tutorials if you search YT so I didn’t see the need to reinvent the wheel here.

If you love this collection or I have inspired you to try to make this card style, please leave me a kind comment below.


Au revoir!   Auf Wiedersehen!   Tot ziens!

See you again soon,


Lesley


Wednesday, 24 November 2021

Floating pop-up box - any size

 Good morning,

Today I have a pop-up box thats a little different. I spotted this shape on Pinterest but those boxes all seemed to have been made with specialist dies and I wanted to make one NOW! I'm sure you know this feeling! After I had started making this, I did spot a tutorial using a similar method to mine by #IcedImages so I have linked that tutorial below. My way makes it possible to achieve any desired card size.


This is a hexagon-shaped pop-up box that folds flat to post and the design travels down the card and floats on acetate. It took 2 sheets of A4 card and a scrap of acetate.

I was going to use hexagon nesting dies but mine are stitched and I wanted plain! Grrh! so I had to draw out my own shapes - not that difficult if you have a school-type compass as a hexagon is basically 6 equilateral triangles put together. 


Start by drawing a line. I wanted a side length of 2 1/4" so set compass to that length and marked line, put point at each corner to draw traingel. From top point I could draw a crcle and continue with triangles until I had a hexagon shape by joining all base point - simples! I then extended one side to make a square of 2 1/4 " and cut it out of card to use as a template. I drew around this and added a square on each side of the square (now 3) and a 1/2" tab to one of those squares. (see shape on left).


I repeated this shape and added a second hex to the drawing for the other part on the right. one hex from each drawing was scored across the centre. The square were score downwards but not across the untousnscored hex as this is the stand-up section at the back. I joind the tabs on the squareto form a ring and eassed into desirted shape. the 2 scored hexagons were glued across half the shape to form a stand-up wall across the centre to hold the acetate. I chose that size so it was easy to add 2" matts to the sides! 


I roughly cut an oval shape by eye from acetate scrap and adhered all the decorations, lifting some on foam pads in front, some were placed on the back panel and some with foam on back to give layers of dimension. finally, added a last decorative element to the from of the box to create my little woodland idyll in a box.

All my decorations are stamped images from the beautiful atamp sets - there are three different ones and I really do need all three. The animals are so very cute and not difficult to colour or fussy cut. 

I bet you guessed, I am totally smitten with it! 

If you like this card, please leave me a few kind words below  and pop across to my other social media pages for more makes with this collection. 

https://www.instagram.com/elegant_edges_crafts/?hl=en

https://www.facebook.com/kilby.Lesley


See you soon

Lesley x


Tutorial: https://www.youtube.com/watch?v=IsDf9opHXZA&t=14s


New Collection - In the Forest by Craft Consortium


Hi everyone.

I am really excited to share the beautiful new Collection by Craft Consortium – In the Forest – designed by Claire Therese. This is being launched today and I cant wait for you to see it!

It comes in 12 x 12 and 6x6 acid free paper pads. They contain a mixture of 200gsm uncoated papers and 150gsm pearlescent papers, a generous 40 double-sided sheets in each pad, and are just wonderful to work with. Even the inside covers are covered with topper elements from the pads that can be cut out and used like extra chipboard items. There are also 3 different stamp sets, washi tapes, metal charms, enamel dots and chipboard elements. Everything is the high quality that we have come to love and expect from Craft Consortium.

I was truly blown away when I opened my DT package and my creative juices started to work. I am quite a reluctant stamper but the first thing I did upon opening my package, was to stamp and colour all the images, cut them out and just play!


Some of my fellow Design Team members have produced short YT videos showing the collection in all its glory and I’ve listed the links to their SM below. Do hop over to their channels and to my Instagram - elegrant_edges_crafts,  where  I'll be sharing a new make each day. Please leave each of us some love as it makes our posts more visible.

Thanks for visiting

Lesley x

https://www.instagram.com/elegant_edges_crafts/

 https://www.youtube.com/c/ElisabethHogarthDesigns

 https://wordpress.com/view/elisabethhogarth.wordpress.com

 https://youtube.com/c/TheMissHaven

 https://www.instagram.com/themisshaven

https://youtube.com/channel/UCqZLivtQUb1cG2ahYnhHlLQ

 https://www.instagram.com/cardsbykatefletcher

 https://www.facebook.com/Cards-by-Kate-111227389688501/

Super Easy Faux Pleat cad

Good Morning, It's been some time since I posted on my blog, but I hope you have all been following me on Instagram and Facebook, as tha...